Posts

Showing posts from August, 2022

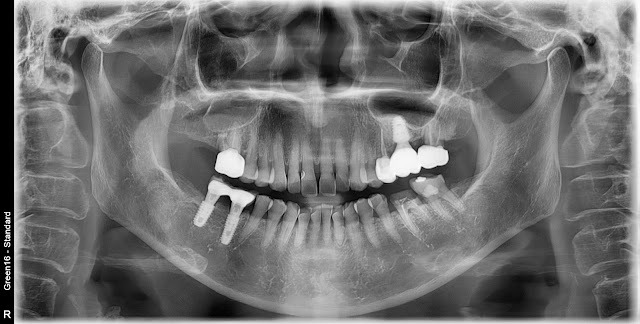
Oral maxillary sinus perforation occurring after tooth extraction.

Image
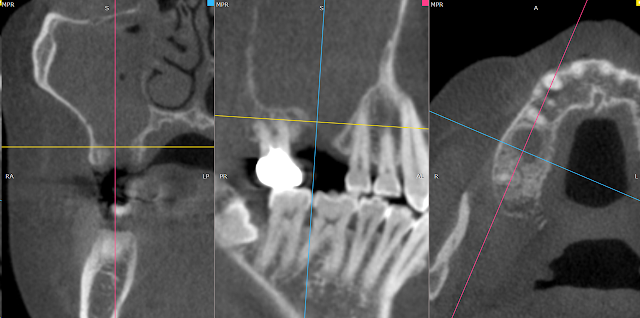
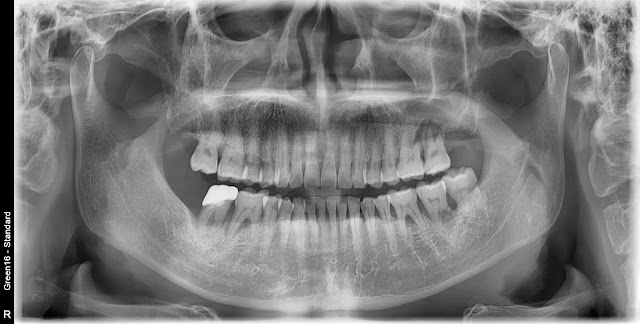
#16: Extraction-related maxillary sinus perforation after tooth extraction. The maxillary sinus is filled with pus and there is an oroantral fistula (OAF) through which drainage is occurring. The buccal fat pad is pulled over to cover and seal the area. The upper gum is sutured appropriately. No releasing incision was made on the opposite side. Here is the appearance after 6 weeks. When suturing by pulling the gum on the opposite side or rotating the gum on the palate side, there can be cases where it reopens. However, when using the buccal fat pad, the success rate seems to be higher. This is the CT scan after 6 weeks.   Professor : Jin-Yong Cho https://www.gilhospital.com/en_US/web/foreigner/doctor?p_p_id=searchDoctor_WAR_bookingHomepageportlet&p_p_lifecycle=0&p_p_col_id=column-1&p_p_col_count=1&_searchDoctor_WAR_bookingHomepageportlet_action=view_message&_searchDoctor_WAR_bookingHomepageportlet_doctorId=54946

When conducting socket preservation simultaneously with tooth extraction

Image
A 51-year-old male patient. Implant placement is planned for the maxillary tooth #26 area. Due to inadequate bone on the palatal root side, an extraction was performed with simultaneous socket preservation. Implant placement was performed after approximately 4 months of socket preservation. Here is a photo of the implant in place. Implants from Ossteo Bionics, specifically the SB implants, were placed during the procedure. The implant was placed using a crestal approach in the maxillary area, and BioCrea was used for grafting during implant placement. This is a post-operative radiograph after the surgery. The bone density at the time of implant placement was approximately D3. Here is a brief summary of the implant surgery record I use: I always make sure to record the bone quality, initial stability, and generally, I note down the expected prosthetic placement date at the time of implant placement. Here is a photo taken about 3 months after implant placement. While I don't always m

When the amount of bone loss is minimal during implant placement

Image
A female patient, aged 56, is scheduled for immediate implant placement in the area of tooth number 36. The tooth was extracted, and the inner soft tissue was removed. The bone on both the buccal and lingual sides remains intact. An implant was placed, and the empty space on the top was filled with collagen bone for augmentation. Subsequently, a bone healing abutment was also placed. In cases of minimal bone loss, personally, I find it convenient to use this type of synthetic bone. Post-operative X-ray image. Post-final prosthesis image at around 3 months.  

The utility of Bone Healing Abutment.

Image
The patient is a 75-year-old woman, and it has been decided to proceed with immediate implant placement in the area of tooth number 36. First, the extraction was performed by carefully separating the tooth from its root in a radicular direction. The septal bone is well visible. The drilling was performed on the septal bone, as close to the center as possible. The implant was placed at a depth matching the level of the septal bone. Since the initial stability was good, and there was minimal interference from adjacent bone, I installed the 704 Bone Healing Abutment. In this case, the 704 Bone Healing Abutment was used due to the unavailability of the 804, which would have been more advantageous. Since the area around the implant was already surrounded by native bone, there was no need for additional bone grafting. Instead, collagen was applied to the empty space to facilitate better healing. After the surgery.   The surgery was completed with the application of a perio-pack. The removal

When severe gum inflammation is present

Image
The patient is a 59-year-old man. Due to chronic periodontitis in tooth number 21, immediate implant placement was not possible. Therefore, extraction was performed first, followed by socket preservation after the extraction. Here is the post-extraction appearance. The infected tissue inside was meticulously removed, dedicating time to ensure thorough removal. Subsequently, a resorbable membrane (Xenoguide) was placed on the buccal side, followed by the placement of homogenous bone graft material. The area was then sutured. Here is a post-operative photo. Q1. I'm curious about the reason for using a resorbable membrane instead of a non-resorbable membrane. A1. There isn't much difficulty with resorption, and since the anterior area is also lightly protected with temporary teeth, it doesn't seem necessary to use a non-resorbable membrane. Q2. When is it possible to place the fixture implant? A2. Expected to place the implant after approximately 4-5 months. Q3. Do you believe